Two good things in life:
- Picking up trash
- Spending time in the outdoors taking photos
So why not try making a pinhole camera out of an old can? It’s so easy to do and I absolutely love the dreamy images produced, where each day’s arc of the sun becomes a solid white stripe across the page.
Here is a short video of my first attempts, followed by a step-by-step guide if you’d like to try it yourself.
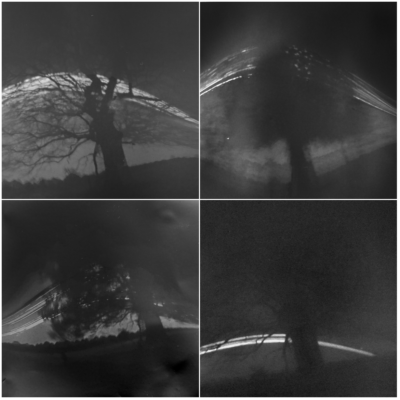
Here are four seasons in one tree:
Every year Earth travels more than 500 million miles around the Sun. And my oak tree has quietly stood and watched this mad orbit hundreds of times.
Over the past year I’ve set up beer can cameras [explained in a moment!] to capture the sun’s arc in the weeks around the spring equinox (bare branches, plenty of sunlight), the summer solstice (bushy foliage, seems to have been quite windy), the autumn equinox, and the dark, gloomy winter solstice when the sun barely crept above the horizon.
I have really enjoyed this intermittent year-long excuse to tramp out to this tree and notice the seasons come and go. The more you pay attention, the more you see, and the more you care.
On my first, summer visit I spotted an owl nesting high on the tree. In autumn I gathered gigantic field mushrooms growing beneath it. At the winter solstice I retired promptly to a pub with a log fire. And yesterday, when I returned to collect my spring ‘camera’ I was nervous as an entire year depended upon a good result. I was delighted that it was the best of the lot.
How to make a Camera out of a Can
-
Find Two Cans
Pick up two empty drinks cans—ideally large 440ml beer cans rather than standard Coke cans. -
Buy Photographic Paper
Get light-sensitive paper like Ilford Multigrade V RC Deluxe Pearl 5×7. This reacts to light and captures your image. You can buy it here. -
Prepare the Cans
-
Rinse both cans.
-
Cut the top off one can—this will be your camera body.
-
Cut the second can about 5cm from the bottom—this will be your lid.
-
-
Make the Pinhole
Use a pin (not a drawing pin) to make a tiny hole slightly above halfway up the camera body. Cover the hole from the outside with a small piece of gaffer tape until you’re ready to expose the photo. -
Load the Paper (in very dim light)
-
Remove one sheet of photographic paper.
-
Curl it inside the camera body, shiny side facing the pinhole, matte side against the metal.
-
Leave a small gap in the paper where the pinhole is.
-
-
Seal the Camera
Fit the lid onto the camera body and tape them together securely. -
Position the Camera
-
Aim the camera south to capture the arc of the sun as it moves across the sky.
-
The pinhole acts like an ultra-wide-angle lens—wider than even the 0.5x mode on your phone—so place it closer to your subject than you might expect.
-
Tilt the camera slightly upwards to ensure it captures the sun’s path.
-
-
Secure the Camera
-
Fix the camera in place using gaffer tape or cable ties.
-
Once secured, remove the gaffer tape “lens cap” from the pinhole and stick it somewhere safe on the can so you can re-cover it later.
-
-
Be Patient
-
Exposure time can be anywhere from 24 hours to several months.
-
For your first attempt, try a 24-hour exposure to quickly learn and adjust if needed.
-
When you’re ready to collect it, cover the pinhole again with the gaffer tape.
-
-
Process the Image
-
In very dim light, open the can and remove the photographic paper.
-
If successful, you’ll see a faint pink and white image.
-
All white? The paper was likely inserted the wrong way around.
-
All pink? It’s overexposed—maybe the pinhole was too large or too much light got in.
-
-
Digitise the Photo
-
Work quickly to avoid further exposure.
-
Tape the paper flat and photograph it using your phone or camera, or scan it.
-
Edit the Image
-
Use your phone’s editing tools or a program like Photoshop to:
-
Invert the image (it will become bluish).
-
Adjust brightness, contrast, and curves to bring out the details.
-
Hopefully, your first solargraph turns out beautifully. It’s a slow, thoughtful way to see time pass—and a satisfying creative project using little more than litter and light.
I have really enjoyed experimenting with these cameras and I would like to thank Ian Ruhter whose Instagram video first blew me away, and Justin Quinnell whose YouTube videos were really helpful for me.
Click on the image below to see my latest solargraphs:
